A van life electrical setup encompasses your batteries, solar, split charge relay and everything else that powers your van and is the thing which we get the most questions about. While undertaking a campervan conversion is a fun process to do yourself, the one aspect people feel least comfortable with is the van electrics. Most people have little to no experience with electrics and worry about the safety implications of ‘doing it wrong’; well we’re here to tell you that it’s not a difficult and dangerous as you’re thinking, you just need to know what you need and how to use it and you’ll have power in your van in no time.
What you’ll need
Before we get started on how to start your van life electrical set up I’m going to go through a list of everything you are going to need. It might seem like a lot but this is the minimum you’re going to need to be able to make a safe 12V electrical system in your campervan. Once you have all the things you need from the list below we can go into more depth about how we can put them to good use.
- 110ah AGM Battery
- 12V 3-Way Battery Terminals
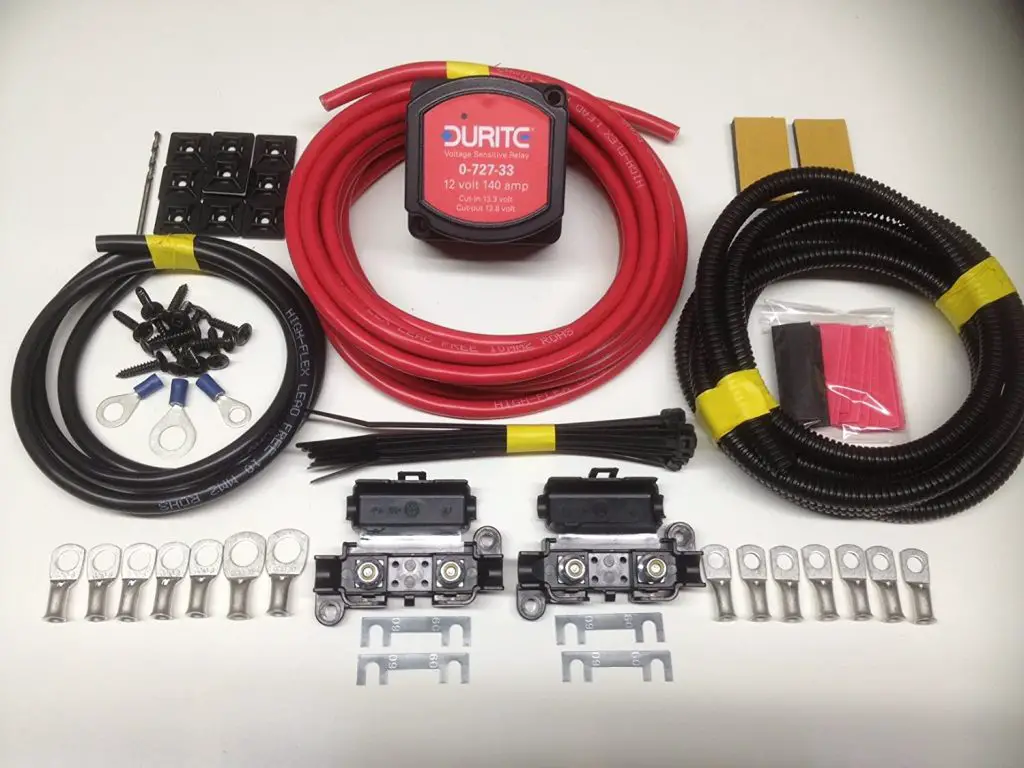
- Split Charge Relay Kit
- 12V Fuse Box
- Cable Lug Set
- 12V Sockets and connectors
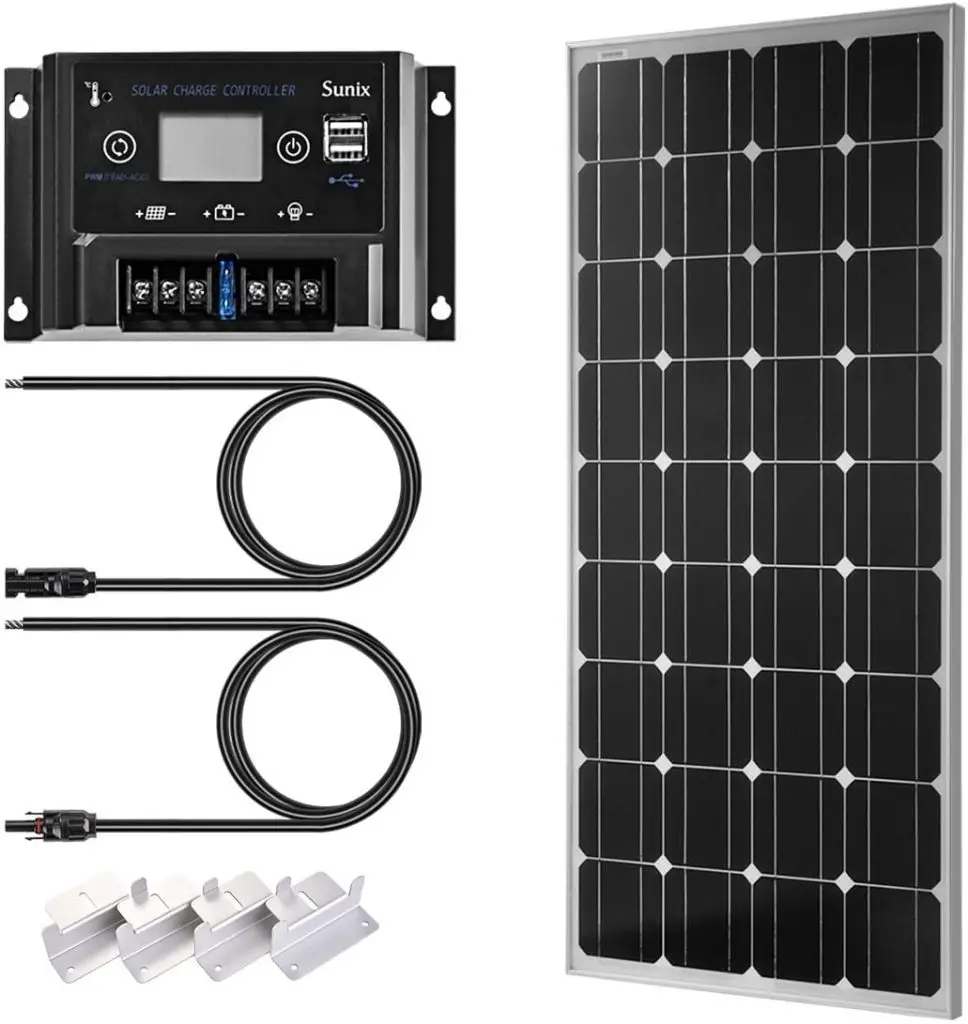
- 100W Solar Panel Kit
- 12 AWG Black and Red Cable
- 2.5mm Black and Red Cable
- 16mm Black & 16mm Red Cable (will depend how far away your leisure battery is stored from the starter battery)
Putting together your electrical set up
Now that you have all of the above it’s time to start setting up your electrical system in your van. While it might not seem like it, it’s now a case of piecing everything together and plugging everything in, in the right order of course. Both the solar kit and the split charge relay kits come with detailed instructions of how you can connect these to your leisure battery so when we get to those parts of our campervan electrical set up I very much recommend following the instructions provided to ensure that they are connected safely however I will give a brief overview here anyway.First things first is placing your 110ah AGM Battery in the van itself and securing it where you want this to stay. It needs to be secured to the van to ensure it doesn’t move while in transit and to make sure the connections to it don’t rattle free.
Once the battery is secure you will need to attach the 12V 3-Way Battery Terminals to the terminals of the battery, they simply go over the positive and negative terminals of your battery and bolt securely. It’s on these terminals that we are able to connect the solar kit, split charge relay and fuse box.
The next step is to fit the Split Charge Relay Kit to your van. This particular kit includes everything you will need to connect your batteries together, ensure that they are safely fused with in line fuses as well as add the voltage sensitive relay to your van so that when the engine is on both your starter battery and your leisure battery will be charging. Installing is as simple as connecting your starter battery to your leisure battery via the relay itself, you do this with the cables provided and the lug connectors in the kit. The negatives of the batteries are connected using the black wire and the positive terminal of your starter battery is connected to the split charge relay (via an in line fuse) and then from the relay to the positive terminal of the leisure battery (again via an in line fuse included in the kit). A small negative wire from the relay is then connected back to the starter battery and you have a connected system. For more detailed instructions see the included instructions in the kit.
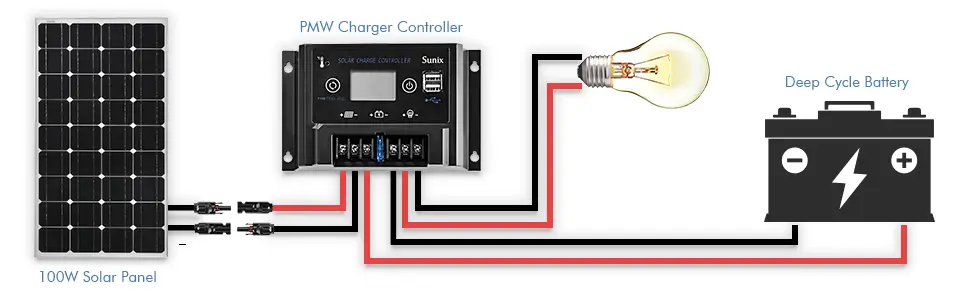
It’s now time to add our solar panels to this set up. Solar panels connect to the battery via a solar charge controller, this helps regulate the power coming into the battery as well as stopping current moving in the opposite direction. The 100W Solar Panel Kit comes with a single panel and a charge controller as well as the wires needed to connect the panels to the controller. Again the kit itself comes with detailed instructions you should follow however the basics are as follows. The first thing you need to do is to mount and connect your charge controller to your leisure batteries using the 12 AWG Black and Red Cable, these are connected on the charge controller on the positive and negative battery outputs and connected to the relevant terminal on your leisure battery 3 way terminal. It’s VITAL that you don’t connect your panels to the charge controller until it is connected to the battery. Once you have wired the charge controller to the battery you are able to mount your solar panels and connect them using the included cables in the kit to the charge controller. This should now show on the display that you are now receiving power directly from the solar panels.
Now that we have all this power coming into the van we just need to add some outlets and our fuse box and we’re ready to go. The 12V Fuse Box is connected to the positive and negative terminals of your leisure battery, this feeds power into the fuse box itself where you can connect any appliances via a positive wire and a negative wire and including the relevant fuse. For this set up we’re using a 12V Sockets and connectors set which will give us a USB socket, a 12V Cigarette socket, a voltmeter to keep track of your battery level and a switch. Using the wires included plug a positive and negative into the back of each socket’s terminals and run these to your fuse box, attaching them into the relevant positive and negative side. You can extend these cables using the 2.5mm Black and Red Cable if plan to run them a long way from your fuse box. Add an appropriate fuse and you now have power to your system and you are ready to go.
Things to know
Hopefully the above is enough to get you started on your complete camper van electrical set up and realise that once you have the correct equipment then it really is as easy as plugging it all in in the correct order. Before you get started there’s a couple of things you need to know however. First foremost, although 12V is relatively safe, especially compared with the 240V that you find in your house, you still need to take it seriously. Ensure you connect everything carefully and tightly and avoid connecting the positive directly to the negative as this will cause sparks, fire or potentially an explosion.
Secondly it’s worthwhile for you to complete an energy audit before you decide on how big a battery you need in your van. 110ah will be enough to run lights, charge phones and laptops and have a basic set up like this one however if you plan on running fridges, TVs, heaters and games consoles then you are going to need to consider adding more batteries to your set up. To complete an energy audit you need to list all the of the electricals you plan to use, how many amps they draw and how long per day you are planning on using them. Once you have that information you can find out how many batteries you will need. Note that although a 110ah battery has 110 amp hours in it, only 55 of those are actually usable as you can’t discharge your battery more than half way without damaging it long term.
The final thing to know is that although we have fitted a number of complete electrical systems in vans we are not professionals and you should always follow the instructions and guidelines set out for you on the kits provided.
